
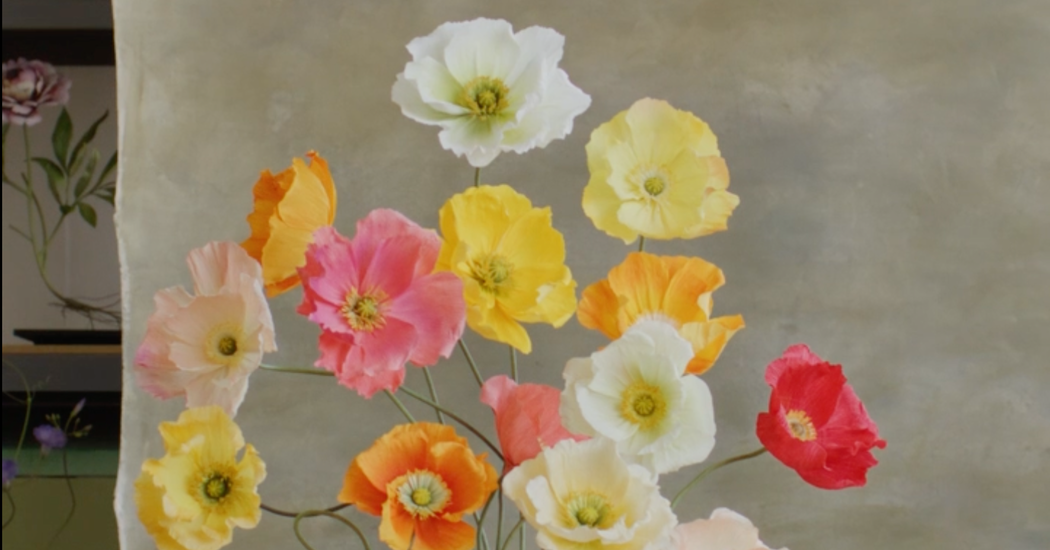
Paper flowers, which date back to around 100 B.C. in China, have been around almost as long as paper itself. The earliest examples were likely used as religious offerings but, thanks to the Silk Road, the craft soon spread globally, emerging as a decorative art. The Brooklyn-based artist Sourabh Gupta, 36, grew up making paper blooms at home in Hiranagar, in the Indian state of Jammu and Kashmir; he was inspired by the faux bouquets pinned to the bulletin boards at his Catholic school around Diwali and Christmastime. In 2019, having moved to New York, he left a graduate design program at Parsons and returned to the meditative creative practice, working out of his Harlem apartment. He had “no money, no tools and no workshop,” he says, but the fashion world took notice of his work on Instagram and began commissioning pieces from him. That year, he made more than 300 paper daisies that were sewn onto the designer Tory Burch’s Met Gala gown and, in 2022, he created a sculptural, ivy headpiece for Oscar de la Renta. He’s also made vibrant, nonwearable arrangements for brands like Bergdorf Goodman and Tiffany.
Over the past three years, Gupta’s practice has evolved to include more durable materials like metal, porcelain and wood, but he credits crepe paper with kicking off his career and recommends it as a starting point for anyone interested in making their own faux flora. And while his work is incredibly lifelike, he insists that paper flowers don’t have to look real to spark joy. “It’s about capturing a feeling, really, not replicating,” he says. “When someone sees them, it should make them smile.” Here, Gupta shares his process for realizing an Icelandic poppy (a bloom whose petals are often compared to crepe paper) from basic household and craft-store supplies. If you repeat the process a few times over, you’ll have enough for a cheery and infinitely reusable dinner party centerpiece.
1. Cut the stem
Cut the clothesline wire with the clippers to your desired length. (The stems in Gupta’s final arrangement vary in length, which gives each flower some breathing room. Longer stems can also be bent to create interesting shapes.)
2. Make the center
Cut a paper towel into half-inch-wide strips. Hot glue the short end of one strip to the tip of the wire. Apply a line of tacky glue along the bottom long edge of that strip as well as three other paper towel strips. Wrap the first strip around the tip of the wire and then add the other strips on top, scrunching them a bit as you wrap, to create the flower’s ovary.
3. Cover the ovary
Cut a half-inch-wide strip of the green crepe paper and apply a line of tacky glue along its length. Affix it to the stem, about an inch below the ovary, and wrap upward to cover the ovary, cutting and gluing additional strips as needed until you’ve fully concealed the paper towel.
4. Make the faux pollen
Break off a small piece of yellow pastel and crush it using the mortar and pestle into a powder that’s roughly the consistency of fine table salt. (If you don’t have yellow pastel, you can substitute turmeric, but beware of staining.)
5. Add the pollen
Draw an asterisk shape onto the tip of the ovary with tacky glue. Dust the yellow powder over the glue, gently tapping and shaking off the excess. Set the stem aside.
6. Create the stamen
Cut a 12-by-1-inch strip of white crepe paper and use yellow pastel to apply a wide line down its center, smudging and softening the line with the makeup sponge. With the ocher-colored marker, draw a line along one long edge of the strip and then flip the strip over and draw another line on the same edge on the back side.
7. Fringe the stamen
Fold the strip a few times. Snip into the ocher-colored edge, stopping about a quarter-inch from the bottom, every centimeter or so, to create fringe. Carefully unfold the strip.
8. Attach the stamen to the stem
Apply a line of tacky glue along the non-fringed edge of the strip and affix it to the ovary’s base, wrapping the strip around the ovary and fanning out the fringe.
9. Cut the petals
Fold an approximately 10-by-10-inch piece of yellow crepe in half lengthwise and then in half again, creating an approximately 10-by-2.5 inch rectangle. Cut the rectangle along the long end into three pieces and then scallop the edges of one piece to mimic a petal shape. Unfold that piece and refold it into thirds. Texturize the edges a bit more with the scissors and then cut along the folded edge to create three separate, roughly Post-it note-size petals. Repeat this process until you have nine petals. (These pieces don’t need to be uniform and, in fact, should vary slightly in size.)
10. Color the petals
Use pastels to shade each petal. Gupta went with dark pink and red, but use whatever you like. (Icelandic poppies come in all kinds of colors.) Smudge the pastel into the paper with the makeup sponge.
11. Fan the petals
Add a line of tacky glue to the bottom of each petal. Fan fold each petal along its glued edge. Staple the bottom of each petal to hold the fan shape in place.
12. Texturize the petals
Twist each petal a few times, from the midpoint to the tip, as if wringing out a wet towel. Unwrap the petals carefully and shape them into shell-like cups. Gently stretch out the top edges to fan them out and add dimension.
13. Glue the petals to the stem
Add a small squeeze of hot glue to the stapled part of a petal and attach it just below the stamen. Repeat this with all of the petals, working all the way around the center. For the first layer, line the petals up side by side but not overlapping. For the second and third layers, add petals so they overlap and fill in the gaps of the preceding layers. You can use a skewer to curl the petals slightly if you like.
14. Cover the stem
Use the green floral tape to cover the wire. Stretch the tape slightly as you wrap to activate the adhesive, and pull the tape taut around the wire to keep it in place. Alternatively, you can cut long thin strips of green crepe paper, apply tacky glue and wrap those around the stem. Glue a few little scraps of yellow crepe paper to the underside of the flower to hide the staples.
Voilà, your stem is in full bloom.

